Showing posts with label watercolor. Show all posts

September 9, 2022

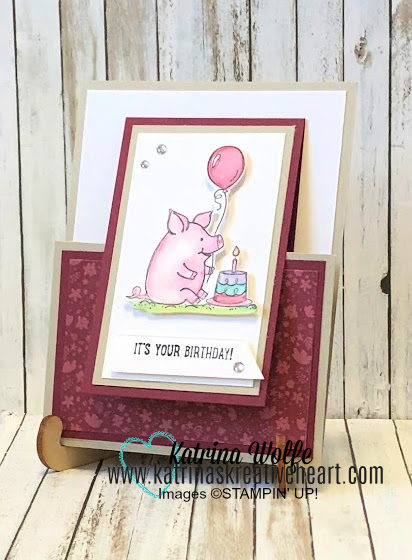
This Birthday Piggy Flip Up Fun Fold

 Hello my friends! First, I'd like to thank those of you that came over to YouTube to watch my Live Stream. I'm so happy that it worked so smoothly unlike my Facebook Lives that keep glitching and freezing. So thank you! That was fun, and we will definitely do it again. 

Wanna catch the replay? 


Anyhoo, I love this layout/fun fold. It's not only easy, but it looks great and This Birthday Piggy set works perfectly with it. 
flip up fun fold birthday piggy
To color this image, I again pulled out my Watercolor Pencils Assortment2 and my Blender Pens. I LOVE the blending that I get with these two coloring tools together. During my last Facebook Live, we decided our Piggy's name was Wilbur and Wilbur looks GREAT in Flirty Flamingo pencil, don't you think? What is your go to coloring tools? Is it the Watercolor Pencils? Stampin' Blends? Watercolor with your ink pads or re-inkers? I'd love to know. Leave me a comment and let me know your favorite way to color your images?

Don't forget to grab your FREE downloadable PDF with all the measurements!

Happy Stamping.

Product List
Blender Pens
[102845]
$12.00

August 12, 2019

Pigment Sprinkles 3 Ways with the Modern Heart Stamp Set by Stampin' Up!

Hello and Happy Monday! I hope you're  week is off to a great start! Today I want to share with you 3 cards I made during my Facebook Live last night featuring the awesome Pigment Sprinkles and the Modern Heart Stamp Set.
I love the versatility of the Pigment Sprinkles watercolor. There are so many ways and so many uses for these richly pigmented watercolor crystals that they are a must have in any craft room.
First, there is the direct to paper watercolor. With this technique, you sprinkle the dry watercolor crystals onto your project and spray with water to explode the color.
Pigment Sprinkles 3 Ways with the Modern Heart Stamp Set by Stampin' Up!
In this particular example, I did an emboss resist by stamping my image in Versamark clear pigment ink and added clear embossing powder to heat emboss my image. I then sprinkled it with Bermuda Bay, Mellon Mambo and Gorgeous Grape Pigment Sprinkles, spritzed  with water and heat set the color.
For this second example, I used the "smooshing" technique by sprinkling the watercolor crystals onto a piece of Saran Wrap, spritzed with water and then smooshed my watercolor paper into the color. Here I used Mellon Mambo and Daffodil Delight.
Pigment Sprinkles 3 Ways with the Modern Heart Stamp Set by Stampin' Up!
In the 3rd and final example, I painted with my Pigment Sprinkles. I added the crystals to wells in my watercolor pallet and added water. I then used my AquaPainter to pick  up the color and paint the geometric shapes within my heart. I then fussy cut the heart and added  it to my project using Stampin' Dimensionals.
Pigment Sprinkles 3 Ways with the Modern Heart Stamp Set by Stampin' Up!
Another great use for these Pigment Sprinkles would be to color White Embossing paste, or glue that you may  want to add color too.  You can also use them to color White acrylic paint or White enamel paint. The the options are endless! Want to die ribbon? Add some Sprinkles to alcohol and soak your ribbon for a bit, then remove and  allow to dry...fast drying dye!
What other mixtures might you color with Pigment Sprinkles? Share your thoughts in the comments below. I'd love to hear!


Happy Stamping,


Product List

June 28, 2019

Free As A Bird in Pretty Peacock

Hello and Happy Friday! I know...surprise post! I don't normally post on a Friday, but I told you, I am having SO much fun with this stamp set! It might also have something to do with the fact that after today, I start my week long stay-cation! Am I the only one that LOVES stay-cation? I love my home and I LOVE being home so to me, stay-cations are the best. Maybe it's because I feel like I'm not home much? Between working full time outside the home coupled with an hour commute each way, I'm away from home a minimum of 10 hours a day, longer if my work day runs over (which happens A LOT!) or I have errands to run, so, I guess that makes me appreciate home.
Anyhoo, back to why we're all here...the card.
This one I decided to use my ink pads and Blender Pens to color and I am so happy with the results. After stamping the image onto Whisper White with Stazon ink, I used Pretty Peacock for the birds, Daffodil Delight for the beaks, Rococo Rose for the flowers on the branch, Sahara Sand for the branch and the leaves are done in Shaded Spruce. All I did was squeeze my closed ink pads bottom up (the new ink pad style squeeze much easier this way) to create a pool of ink in the lids, then using my Blender Pens, I picked up a little ink and colored. Nothing fancy going on here just simple coloring. Then, using the largest of the Stitched Nested Label dies, I die cut the image out, then I trimmed off the right side to create a flat edge. The sentiment is from another stamp set, Celebrate with Cake found in our Beginner Stamper brochure. I then took a half sheet of Pretty Peacock and scored it at 4 1/4" for my card base and layered a piece of Crumb Cake measuring 3 3/4" x 5" and a layer of the 2019-2021 InColor DSP in Pretty Peacock measuring 2" x 5". These layers where all adhered flat with Snail adhesive. I then popped up the stamped layer with Stampin' Dimensionals and to finish the card up, I added the coordinating 2019-2021 InColor Faceted Dots.
I hope you enjoyed today's card. Please feel free to leave a comment. I'd love to hear what you think of if you have any questions, I am more than glad to answer them.
Happy Stamping,


Product List
01 09 10 Code line 7 9 is for loading jQuery library. Remove this line if you’ve already loaded it somewhere else in your blog. Hint: If your blog has an image slider, carousel or something with fading effect running, chances are it is powered by jQuery. If this widget doesn’t work, the first thing you want to do is comment out or remove this line. To use your own button, replace the URL in line 3 with the direct link URL to the image. Make sure to keep the quotes. To reposition the button, replace